Hey everyone, thanks for stopping by. As someone who’s been around horizontal machining centers (HMCs) for over a decade—first as a tech on the factory floor, now as part of the team supplying these bad boys—I can’t tell you how many times I’ve gotten calls from shops that bought an HMC, got it delivered, and realized they had no clue what to do next. They thought, “Hey, it’s just a big metal machine, right? We’ll roll it in, plug it in, and go.” Spoiler alert: that’s how you end up with a $150k paperweight and a really stressed maintenance manager. Today, I’m breaking down the real, non-BS installation requirements for an HMC, straight from the pros who install them every single week. No fancy jargon, no vague “industry standards”—just what you actually need to get this machine working right, and fast. Horizontal Machining Centers

First off, let’s get one thing straight: HMCs aren’t like your old vertical mill you’ve had since the 90s. Those are great for small parts, but HMCs are built for heavy, continuous runs—think aerospace components, big engine blocks, mold cores that take 10 hours to machine. They’re way heavier, way more precise, and way pickier about their environment. Cut one corner on installation, and you’ll be dealing with drift, tool breakage, or even structural damage before the first month is out. I’ve seen shops skip the floor prep, and three months later their spindle alignment was off by 0.02mm—enough to scrap a whole batch of parts. Not cool.
Let’s start with the foundation, because this is the non-negotiable core. I can’t stress this enough: your HMC’s floor needs to be solid, level, and designed specifically for this machine, not a guess. Most people just look at their existing concrete floor and think, “That works for my lathe, so it works for the HMC.” No. HMCs weigh anywhere from 10 tons for a mid-size model up to 30+ tons for the big 5-axis ones. That weight isn’t just sitting there—it’s bouncing, vibrating, and shifting slightly every time the spindle plunges into a thick block of steel. If your floor has even a tiny soft spot, that vibration will throw off your precision in no time.
So what do you actually need? Let’s talk specs. The concrete has to be a minimum of 6 inches thick—8 inches is way better for larger HMCs. And it can’t be just any concrete; it needs to have a compressive strength of at least 3,000 PSI, but 4,000 PSI is the sweet spot for most installations. You also can’t have any cracks, honeycombing (those little air pockets that weaken concrete), or uneven areas from previous installations. We always recommend having a structural engineer do a quick evaluation before you even order the HMC. Wait until after it’s delivered, and you might have to pour new concrete around the machine’s delivery date—costing you thousands in downtime and rush fees.
Then there’s the leveling, which is way more precise than just using a bubble level. HMCs have linear guides and spindles that need to be dead-on accurate to machine parts to within thousandths of an inch. We use laser levels, not those old spirit levels that hang on your wall. The floor itself has to be level within 0.002 inches per foot across the entire footprint of the machine. For reference, that’s like a quarter of the thickness of a human hair over a 10-foot span. If the floor is even a hair off, we’ll use steel shims between the machine’s base and the concrete to adjust. Don’t skip this step—we once fixed a shop where they leveled with spirit levels, and their parts had a consistent taper of 0.015 inches across the length. Took us half a day to re-level with lasers, and they haven’t had that issue since.
Next up, utilities. This is another area where shops cut corners and regret it. HMCs use a lot more power, air, and coolant than your average machine, so skimping here is a recipe for disaster. Let’s start with power. Most mid-size HMCs need a 480V three-phase electrical supply—some of the larger ones even need 600V. You can’t just tap into the same circuit as your assembly line or your break room fridge. That will cause voltage drops, which make the spindle slow down, cause errors, or even burn out the motor. We always tell shops to have an electrician run a dedicated circuit specifically for the HMC, sized to the machine’s exact power requirements. Check the machine’s manual—we provide that with every unit we sell, by the way—for the full power draw, and get a licensed electrician to inspect your panel before delivery. No DIY here; one shop tried to wire their HMC with an old single-phase circuit, and within a week the control panel fried. Cost them $8k in repairs, plus three days of downtime.
Then there’s compressed air. HMCs use air for a ton of things: changing tools, clamping parts, moving the pallet changer, and even purging the spindle during high-speed runs. Most models need 100-120 PSI of clean, dry air. If your air has too much moisture or oil, that will mess up the tool changers, clog air lines, and even damage the spindle bearings. You need a properly sized air dryer and filter system, not just the little in-line filter from the hardware store. Also, the air line has to be big enough—minimum ¾-inch diameter for most HMCs, so it doesn’t drop pressure when multiple parts of the machine are using air at the same time. We’ve seen a shop use a ½-inch line and wonder why their tool changers were getting stuck half the time. Turns out the pressure dropped to 70 PSI when the changer kicked on, which was below the machine’s requirement. Fixed the line, and that issue was gone.
Coolant is often overlooked too, but HMCs generate a lot of heat when machining heavy materials, so the coolant system has to be sized right. You need a dedicated coolant tank, not shared with other machines, with a filtration system that can handle chips from steel, aluminum, or whatever you’re machining. Some shops try to save money by reusing coolant from their vertical mills, but HMCs move way more chips and generate more heat, so that old coolant will get contaminated fast, leading to poor surface finish on parts. We always recommend adding a coolant chiller too—especially for high-speed runs. It keeps the spindle at a consistent temperature, so you don’t get thermal expansion throwing off precision. That’s a game-changer for aerospace shops that need parts to be within 0.005 inches, no exceptions.
Now, space and access. You’d be surprised how many shops order a massive HMC and then realize they have no room to move it, or no way to get parts in and out, or no space for the chip conveyor. Here’s the rule: you need at least 3 feet of clearance on all sides of the machine. Why? First, you need room for operators to move around, load/unload parts, and access controls. Second, when the pallet changer swaps parts, it needs that space to swing out. Third, chip conveyors—those big systems that carry metal chips away from the machine—stick out the back or side, and if you don’t account for that, you’ll have to move the machine after it’s installed, which is a nightmare. Also, you need clearance for overhead cranes or forklifts to deliver parts and tools. If your shop’s crane has a 10-foot lift, and your HMC’s spindle is at 11 feet when fully extended, you can’t load big parts without taking the spindle apart. We always do a site survey before delivering the machine to map out space, crane capacity, and even door sizes. A small HMC might fit through a 8-foot door, but a mid-size one needs a 10-foot wide door, and we’ll tell you that upfront. Don’t wait until the delivery truck shows up and can’t get into the shop—we’ve had that happen twice, and it’s a $2k fee just to re-route the delivery, plus a day of downtime.
Vibration is another big one I touched on earlier, but it’s worth going deeper. HMCs are precision machines, so even small vibrations from other equipment nearby can throw off your parts. If you have a big punch press, a lathe that’s running 24/7, or even a loading dock that’s super busy right next to the HMC, that vibration will transfer through the floor. We recommend isolating the HMC from other machinery if possible, or adding vibration dampening pads (wait for it—yes, those exist) under the machine’s base if you can’t move it. Some shops install their HMC on a separate concrete slab entirely, not connected to any other floor in the shop. That’s the best way to eliminate cross-vibration, especially for high-precision work. We had a shop that put their HMC right next to a band saw, and their parts had inconsistent surface finish. Isolated the slab, and the finish went from “scrap” to “perfect first run” overnight.
Wait, let’s talk about something specific we run into all the time: logistics and pre-install planning. As your supplier, we always provide a pre-install checklist, but most shops ignore it until it’s too late. Here’s the timeline I recommend: order your HMC, then schedule a site survey within 2 weeks of placing the order. That gives you time to fix floor issues, run utilities, adjust space, etc. Don’t wait until the machine is being built to do this—by then, you’re locked into delivery dates, and changing anything is a huge hassle. We also help coordinate delivery with our team and your shop’s team. The HMC will be delivered on a flatbed, and it will need to be unloaded with a forklift or crane, so we’ll tell you what kind of equipment you need ahead of time. You can’t just use a tiny forklift from the hardware store—you need a 10-ton capacity forklift for most mid-size HMCs, even bigger for the large models.
And let’s not forget post-installation steps, because installation isn’t just dropping the machine and walking away. We always offer a startup service, where one of our techs comes out, calibrates the machine, runs test cuts, and trains your operators on the initial setup. A lot of shops skip this, but it’s worth every penny. Our techs catch things you wouldn’t even think to check—like spindle runout, tool change speed, pallet alignment—that will make or break your first runs. I’ve had shops that skipped startup service and ended up with 10 scrapped parts on the first run, because the machine’s spindle was slightly off-center. A $1,500 startup fee saves you $10k in parts and downtime.
Now, let’s address a common myth: “I can install this myself to save money.” Maybe for a small vertical mill, but not for an HMC. These machines have thousands of moving parts, precision sensors, and complex control systems. One wrong wire, or a slightly misaligned guide rail, and you’re looking at weeks of troubleshooting. We’ve had shops call us after trying to install their HMC themselves, and we have to come in and fix their mistakes. It takes us half the time to get it running right, and it costs way more than if they’d just let us handle the installation to begin with.
At the end of the day, HMC installation is all about planning. It’s not a one-day job—you need 4-6 weeks of prep before delivery, and a day or two for installation and calibration after. Cut corners on the foundation, utilities, space, or post-install calibration, and you’ll pay for it in scrap parts, downtime, and repairs. We’ve supplied HMCs to hundreds of shops, and the ones that follow our installation guidelines are the ones that run their machines 24/7, hit their production targets, and make money. The ones that skip steps? They’re the ones calling us three months later asking for help fixing a part that’s been scrapped because of bad installation.
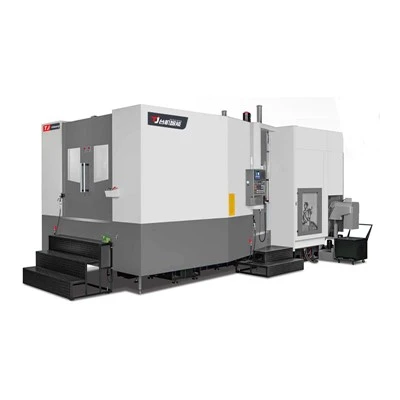
If you’re in the market for a horizontal machining center, do yourself a favor: don’t treat installation like an afterthought. Talk to your supplier early, do the site survey, get the foundation and utilities done right, and don’t skip the startup service. If you have questions about installation, or want to talk about what your shop needs to get set up, reach out to our team. We’re here to help you make sure your HMC runs as good as it’s supposed to—no headaches, no scrap, no wasted money. We don’t do pushy sales, we just help shops get the most out of their machines, and that’s why we’ve been around as long as we have.
Five Axis Machining Center References:
- Haas Automation. Horizontal Machining Center Installation and Operation Manual. 2022.
- Modern Machine Shop. “The Critical Role of Foundation Design for Precision Machining Equipment.” 2021.
- Makino. HMC Site Preparation Guidelines. 2023.
- SME. “Machining Center Installation Best Practices for High-Precision Production.” 2020.
- Machinery Lubrication. “Compressed Air Requirements for Machine Tools.” 2022.
Guangdong Taiji Intelligent Equipment Co., Ltd.
With abundant experience, we are one of the most professional horizontal machining centers manufacturers and suppliers in China. Please feel free to buy cheap horizontal machining centers for sale here from our factory. For price consultation, contact us.
Address: Room 107, Building 15, No. 911 Jian’an Road, Chang’an Town, Dongguan City, Guangdong Province
E-mail: sale@gdtaijicnc.com
WebSite: https://www.gdtaijicnc.com/
