If you’ve ever spent a morning dragging a flimsy garden hose across your yard, tripping over kinks, and scrambling to reel it back in before the sun dries out your newly planted seedlings, you know why a good garden hose cart is non-negotiable. As someone who’s spent the last five years designing and manufacturing reliable hose carts for residential and small-scale garden use, I get asked a lot of questions about these tools—none more common than, “How do I connect a sprinkler system to a garden hose cart?” Garden Hose Carts

It sounds simple, right? Just hook two hoses together and call it a day. But anyone who’s tried that knows the reality: leaky connections that waste water, kinks that stall your watering, and carts that tip over mid-spray because you overloaded them with bulky equipment. Over the years, I’ve helped hundreds of homeowners and even a few small landscape teams work through this setup, and today I’m breaking down the process step-by-step, with tips tailored specifically to making this work with the carts we supply. Whether you’re watering a 1,000-square-foot backyard or a small vegetable patch, this guide will save you time, water, and frustration.
First, let’s talk about why connecting a sprinkler to your hose cart isn’t just a random hookup—it’s a balance of water pressure, equipment sizing, and cart stability. Your hose cart isn’t just a place to store your hose; it’s a mobile watering hub. A good cart should make it easy to transport your sprinkler around your yard without dragging a heavy hose across grass, and it should protect your hose from UV damage and kinks when not in use. When adding a sprinkler, you need to make sure every component works with the others, no matter what size yard you have.
Before we dive into the steps, let’s gather the right supplies. You don’t need special tools, but using the wrong parts will lead to headaches later. Here’s what you’ll need:
- Your garden hose cart (this should go without saying, but make sure it’s rated for the length and weight of hose you’ll be using. For standard residential use, our 100-foot capacity cart works perfectly; for larger yards, our 150-foot heavy-duty model is ideal.)
- A quality garden hose (rated for at least 5/8-inch diameter, which balances water flow and flexibility—too narrow and you’ll get low pressure at your sprinkler, too bulky and it will kink easily on the cart.)
- The sprinkler of your choice (we recommend stationary pulsating sprinklers for large yards, oscillating sprinklers for even coverage of flower beds, and rotating sprinklers for vegetable patches.)
- Hose connectors, specifically stainless steel or brass male and female end caps (avoid plastic connectors—they crack in sunlight and leak after a few seasons.)
- Teflon tape (the unsung hero of outdoor plumbing; it seals threads to prevent leaks without damaging connections.)
Now, let’s walk through the process. Start by prepping your hose cart and hose. Unroll the section of hose you’ll need for sprinkler coverage—don’t unroll the entire hose at once, as this creates more kinks and adds unnecessary weight to the cart. Lay the unrolled section on a flat surface, free of twists. Next, take the male end of your hose (the end that connects to your outdoor faucet) and the female end of your sprinkler. Wait—we’re not connecting those yet. First, we need to make sure the connection points are clean. Any dirt, grass, or mineral buildup on the threads will cause leaks, so wipe both ends with a dry cloth before moving on.
This is where Teflon tape comes in. Wrap three to four layers of Teflon tape clockwise around the male threads of both your hose and your sprinkler. The key here is to wrap in the same direction the connector will twist on—counterclockwise and the tape will unravel when you attach the two parts. Once that’s done, hand-tighten each connection first. Then, use a pair of pliers (wrapped in a cloth to avoid scratching the metal) to give each connection a quarter-turn more—don’t over-tighten, as this can crack the plastic or brass fittings. A common mistake beginners make is cranking down on connections, which leads to stripped threads and costly repairs.
Now, you’re ready to connect the sprinkler to your hose cart. Wait—hold on a second. If you just attach the sprinkler directly to the end of the hose, when you roll the hose onto the cart, the sprinkler will dangle, pulling the hose loose or tipping the cart. That’s why our carts come with a handy hose guide: a small, curved metal bar near the front of the reel that keeps the hose in place as you wind it, and a hook on the side to secure small accessories like sprinklers. Here’s the trick: after connecting your sprinkler to the free end of the hose (the end not connected to your faucet), loop the first foot of hose through the hose guide on your cart, then secure the sprinkler’s base to the side hook. This keeps everything stable as you wind the hose, and when you unroll it to water, the sprinkler stays aligned with the hose path.
Next, test the pressure and check for leaks. Turn on your outdoor faucet halfway—full pressure can damage sprinklers and cause the hose to burst. Walk around your yard while the sprinkler is running, checking for any kinks in the hose that might restrict flow, and looking for leaks at the connectors. If you spot a leak, turn off the faucet immediately, tighten the connection a little more, and re-test. If the water pressure at your sprinkler is low, check for kinks along the entire length of hose—even a small kink can reduce pressure by 50%—and make sure your faucet isn’t partially closed. For those with larger yards, our 150-foot hose carts include a pressure regulator built into the reel, which maintains consistent pressure even at the full length of the hose.
Now, some common mistakes we see customers make when connecting a sprinkler to their hose cart, and how to avoid them. First, overloading the cart. It’s tempting to use a 100-foot hose for a small yard, but extra hose coiled on the cart adds unnecessary weight, making it hard to maneuver. Stick to the shortest hose length that covers your entire yard, and use our cart’s reel lock to keep the hose secure when moving. Second, using a plastic hose. Plastic hoses crack in cold weather and get stiff in the sun, leading to kinks and leaks. We supply heavy-duty rubber hoses that are compatible with all our carts, and they last 2-3 times longer than standard plastic hoses. Third, not winterizing the connection. If you live in a cold climate, disconnect the sprinkler and hose from the cart before the first freeze, drain all excess water, and store both in a cool, dry place. Water left in the hose can expand and burst when frozen, which is the number one cause of hose replacement in the winter.
Another tip specific to our hose carts: if you’re using a larger, heavier sprinkler, like a pulsating model that covers 5,000 square feet, we recommend using our optional hose reel extension. This small add-on mounts to the back of the cart and gives the sprinkler a stable base, so it doesn’t tip over when the water pressure is high. We designed this extension after dozens of customers told us their heavy sprinklers would drag the cart across the yard mid-spray, and it’s become one of our most popular accessories.
Wait, what if you want to use multiple sprinklers? Can you connect them to one hose cart? Yes, but you need a Y-connector, not a splitter. Splitting water with a splitter will reduce pressure for both sprinklers, making them less effective. A Y-connector with individual shutoff valves lets you control flow to each sprinkler, so you can water two separate areas at once without sacrificing pressure. Just make sure the Y-connector is rated for the same water pressure as your hose, and follow the same Teflon tape rule for all connections.
As someone who’s been in this industry for years, I’ve learned that the best outdoor tools are the ones that make small tasks easier. Connecting a sprinkler to a garden hose cart doesn’t have to be complicated, but taking the time to do it right will save you hours of frustration over the life of your cart and hose. If you’re still unsure about which cart or parts are right for your yard, or if you have questions about custom setups, our team is here to help. We’ve helped thousands of homeowners set up their carts, and we can walk you through every step to make sure your watering system works perfectly for your space.
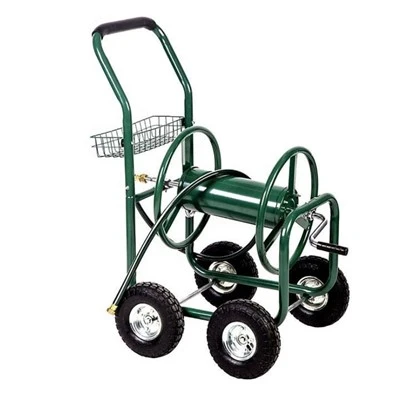
When you’re ready to upgrade your current setup or invest in a reliable garden hose cart that will last for years, don’t hesitate to reach out to our team for a consultation. We offer a range of carts for every need, from compact models for small balconies to heavy-duty carts for large residential yards, and we’re happy to help you find the perfect fit for your gardening routine.
Air Hose Reels References:
- American Society of Landscape Architects. Residential Outdoor Watering Best Practices. 2022.
- Garden Hose Manufacturers Association. Guide to Hose and Cart Compatibility. 2021.
- University of California Agriculture and Natural Resources. Efficient Watering for Home Gardens. 2020.
- Outdoor Power Equipment Institute. Maintenance Tips for Garden Hose Carts and Accessories. 2023.
Yongkang Fengding Industry & Trade Co., Ltd.
Yongkang Fengding Industry & Trade Co., Ltd. is one of the most professional garden hose carts manufacturers and suppliers in China, also supports customized service. Please feel free to buy advanced garden hose carts made in China here from our factory. Quality products and reasonable price are available.
Address: No.96 Lixin Road, Houren Village, Shizhu Town, Yongkang City, Jinhua City, ZhejiangProvince, 321300, China
E-mail: Cecilia@fdgmtool.com
WebSite: https://www.fdgmtool.com/
